Showing posts with label Configuration. Show all posts

Sunday, January 31, 2016

CloudWatch + Lambda Case 4: Control launch of Specific “C” type EC2 instances post office hours to save costs

We have a customer who has predictable load volatility between 9 am to 6 pm and uses specific large EC2 instances during office hours for analysis, they use “c4.8xlarge” for that purpose. Their IT wanted to control launch of such large instance class post office hours and during nights to control costs, currently there is no way to restrict or control this action using Amazon IAM. In short we cannot create complex IAM policy with conditions that user A belonging to group A cannot launch instance type C every day between X and Y.
Some stop gap followed is to have a job running which removes the policy from an IAM user when certain time conditions are met. So basically what we would do is, to have a job that calls an API that removes the policy which restricts an IAM user or group from launching instances. This will make the IAM policy management complex and tough to assess/govern drifts between versions.
After the introduction of the CloudWatch events our Cloud operations started controlling it with lambda functions. Whenever a Instance type is launched it will trigger a lambda function, the function will filter whether it is a specific “C” type and check for the current time, if the time falls after office hours, it will terminate the EC2 instance launched immediately.
As a first step, we will be creating a rule in Amazon CloudWatch Events dashboard. We have chosen AWS API Call as an Event to be processed by an AWSCloudTrail Lambda function as a target.


The next step would be configuring rule details with Rule definition


Finally we will review the Rules Summary


Amazon Lambda Function Code Snippet (Python)
import boto3

def lambda_handler(event, context):
    #print ("Received event: " + json.dumps(event, indent=2))
    #print ("************************************************")
 
    ec2_client = boto3.client("ec2")
 
 
    print "Event Region :", event['region']
 
    event_time = event['detail']['eventTime']
    print "Event Time :", event_time
 
    time = event_time.split('T')
    t = time[1]
    t = t.split(':')
    hour = t[0]
 
    instance_type = event['detail']['requestParameters']['instanceType']
    print "Instance Type:", instance_type
 
    instance_id = event['detail']['responseElements']['instancesSet']['items'][0]['instanceId']
    print "Instance Id:",instance_id
 
    if( instance_type.startswith( 't' ) and hour > 18 or hour < 8 ):
        print ec2_client.terminate_instances( InstanceIds = [ instance_id ] )

GitHub Gist URL:  https://github.com/cloud-automaton/automaton/blob/master/aws/events/TerminateAWSEC2.py

This post was co authored with Priya and Ramprasad of 8KMiles

CloudWatch + Lambda Case 3 -Controlling cross region EBS/RDS Snapshot copies for regulated industries

If you are part of regulated industry like Pharmaceutical/ Life sciences/BFSI running mission critical applications on AWS, at times as part of the compliance requirements you will have to restrict/control data movement to a particular geographic region in the cloud. This is becomes complex to restrict some times. Let us explore in detail:
We all know there are varieties of ways to move data from one AWS region to another, but one commonly used method is Snapshot copy across AWS regions. Usually you can restrict snapshot copy permission in IAM Policy, but what if you need the permission enabled for moving data between AWS accounts inside a region, but still want to control EBS/RDS snapshot copy action across regions. It can be only mitigated by automatically deleting the snapshot on destination AWS region in case snapshot copy activity is done.
Our Cloud operations team used to altogether remove this permission in IAM or monitor this activity using polling scripts for customers with multiple accounts who need this permission and still need control. Now after the introduction of CloudWatch Events we have configured a rule that points to an AWS Lambda which gets triggered in near real time when snapshot is copied to destination AWS region. The lambda function will initiate a deletion process immediately. Though it is reactive it is incomparably faster than manual intervention.
In this use case, Amazon CloudWatch Event will identify the EBS Snapshot copies across the regions and delete them.
As a first step, we will be creating a rule in Amazon CloudWatch Events dashboard. We have chosen AWS API Call as an Event to be processed by an AWSCloudTrail Lambda function as a target.


The next step would be configuring rule details with Rule definition


Finally we will review the Rules Summary


Amazon Lambda Function Code Snippet (Python)


GitHub Gist URL: https://github.com/cloud-automaton/automaton/blob/master/aws/events/AWSSnapShotCopy.py

This post was co authored with Muthukumar and Ramprasad of 8KMiles

CloudWatch + Lambda Case 2- Keeping watch on AWS ROOT user activity is normal or anomaly ?

As a Best Practice you should never use your AWS root account credentials to access AWS. Instead, create individual (IAM) users for anyone who needs access to your AWS account. This allows you to give each IAM user a unique set of security credentials and grant different permissions to each user. Example: Create an IAM user for yourself as well, give that user administrative privilege, and use that IAM user for all your work and never share your credentials to anyone else.
Usually Root has full access and it is not ideal to restrict the same in AWS IAM. Imagine you suddenly doubt some anomaly/suspicious activities done as Root user (using EC2 API’s etc) in your logs other than normal IAM user provisioning; this could be because Root user is compromised or forced, but ultimately it is a deviation from the best practice.
In the past we used to poll the CloudTrail logs using programs and differentiate between “root” and “Root”, and our cloud operations used to react to these anomaly behaviors. Now we can inform the cloud operations and customer stake holders near real time using CloudWatch events.
In this use case, Amazon CloudWatch Event will identify activities if any performed by an AWS ROOT user and notifications will be sent to SNS thru AWS Lambda.
As a first step, we will be creating a rule in Amazon CloudWatch Events dashboard. We have chosen AWS API Call as an Event to be processed by an AWSCloudTrail Lambda function as a target. The lambda function will detect if the event is triggered by root user and notifies through SNS.


The next step would be configuring rule details with Rule definition


Finally we will review the Rules Summary


Amazon Lambda Function Code Snippet (Python)


GitHub Gist URL:  https://github.com/cloud-automaton/automaton/blob/master/aws/events/TrackAWSRootActivity.py

This post was co authored with Saravanan and Ramprasad of 8KMiles

CloudWatch + Lambda Case 1- Avoid malicious CloudTrail action in your AWS Account


As many of you know AWS CloudTrail provides visibility into API activity in your AWS account, Cloud Trail Logging lets you see which actions users have taken and which resources have been used, along with details such as the time and date of actions and the actions that have failed because of inadequate permissions. It enables you to answer important questions such as which user made an API call or which resources were acted upon in an API call. If a user disables CloudTrail logs accidentally or with malicious intent then audit logging events will not captured and hence you fail to have proper governance in place. The situation will get complex, If the user disables- enables back CloudTrail for a brief period of time where some important activities can go unlogged and unaudited. In short once CloudTrail logging is enabled it should not be disabled and this action needs to be defended in depth.
Our Cloud operations team had earlier written a program that periodically scans the Cloud Trail logs entries, if any log activity was missing after an X period of time it alerts the operations.  Overall reaction time on our cloud operations was >15-20 mins to mitigate this CloudTrail disable action.
Now after the introduction of CloudWatch Events we have configured a rule that points to an AWS Lambda function as target. This function gets triggered in near real time when CloudWatch is disabled and automatically enables it back without any manual interaction from Cloud operations. The advanced version of the program triggers workflow which logs entries into ticket system as well. This event model has helped us reduce the mitigation to less than a minute.
We have illustrated below the detailed steps on how to configure this event. Also we given the link for GIT with basic AWS Lambda Python code that can be used by your cloud operations.
In this use case, Amazon CloudWatch Event will identify whether an AWS account has got CloudTrail enabled or not, if not enabled, Amazon CloudWatch Events will take corrective actions by enabling the same.
As a first step, we will be creating a rule in Amazon CloudWatch Events dashboard. We have chosen AWS API Call as an Event to be processed by an AWSCloudTrail Lambda function as a target.


The next step would be configuring rule details with Rule definition


Finally we will review the Rules Summary


Amazon Lambda Function Code Snippet (Python)

import json
import boto3

print('Loading function')
""" Function to define Lambda Handler """
def lambda_handler(event, context):
    try:
        
        client = boto3.client('cloudtrail')
        if event['detail']['eventName'] == 'StopLogging':
            response = client.start_logging(Name=event['detail']['requestParameters']['name'])
        
    except Exception, e:
        sys.exit();

Tuesday, April 22, 2014

Loading Big Index Data into newly launched Amazon CloudSearch engine

Search tier is the most critical section of many online verticals like travel, e-commerce, classifieds etc. If users cannot search products efficiently they will not make their buying decisions properly, which in turn massively affects the revenues of these companies. Most of them are usually powered by Apache Solr, FAST , Autonomy, ElastiSearch etc.  AWS also has a Search Service called CloudSearch which is a fully-managed service in the cloud that makes it easy to set up, manage, and scale a search solution for your website. Amazon CloudSearch relieves you from the worry of hardware provisioning, setup, and maintenance. As your volume of data and traffic fluctuates, Amazon CloudSearch automatically scales to meet your needs.

In AWS infrastructure Apache Solr has been the king and the software to beat till now, recently it has got heavy competitor in the form of Amazon CloudSearch - API 2013-01-01
API version 2013-01-01 of Amazon CloudSearch is internally powered by customized version of Apache Solr Engine, and it is specifically designed for running highly scalable and available search on Amazon Web Services Cloud. This 2013 CloudSearch API has lots of similarities with Apache Solr and customers can easily migrate to this version and leverage the benefits of Amazon Cloud Infrastructure. We are already hearing many AWS customers are planning their migration from FAST, Solr and A9 Engine into the Amazon CloudSearch - 2013-01-01 API engine. 

My team is already migrating couple of customers into this Amazon CloudSearch 2013-01-01 API and i have shared our experience on this process for the benefit of AWS community.

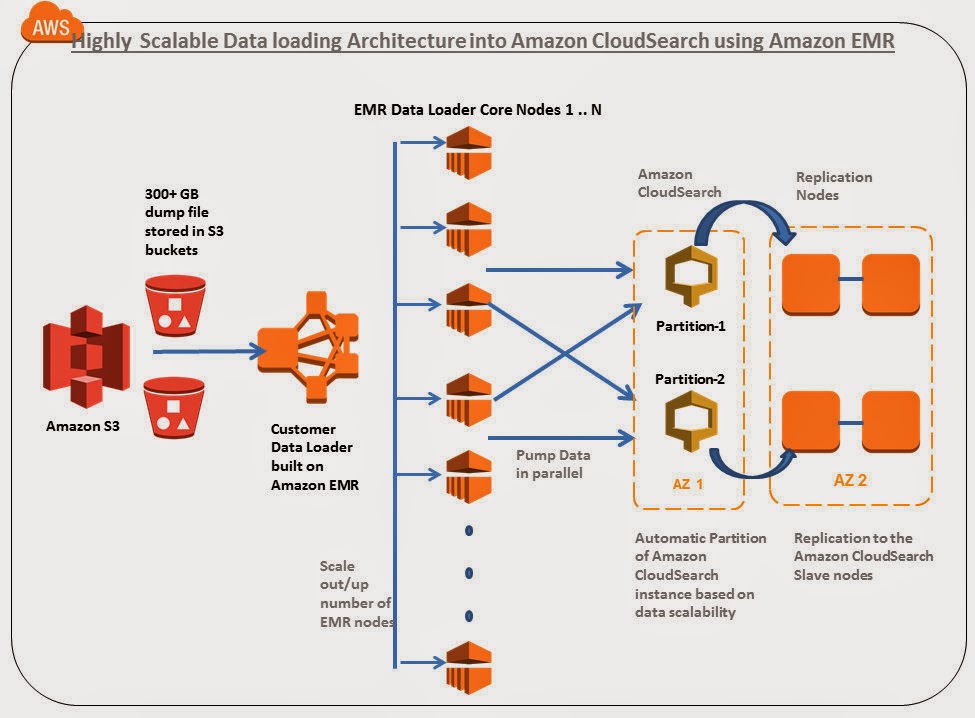
Reference Migration Architecture and requirements:


In this article i am going to explore how to 

  • Migrate a 300+ GB index containing close to 247+ million records distributed in 105 searchable fields in a highly scalable /parallel manner in AWS infrastructure.
  • 300 + GB index file is stored in Amazon S3
  • Custom Data loader program built on Amazon Elastic MapReduce is used for parallel loading
  • Around ~6 Search.M2.2Xlarge are created with 2 partitions and 5 replication count
  • Around 10+ M1.large EMR Core nodes are for Data loading. This loader can be increased to hundreds of nodes depending upon the volume and velocity of data pump required.
  • Amazon CloudSearch Infrastructure provisioning, Automated partitioning, replication count are handled by AWS.   

Lets get into the details below:

Step 1)Create a new Amazon CloudSearch Domain: We have named the search domain as "bigdatasearch" and chose the search instance type as search.m2.2xlarge.  Since we are planning to pump and query a 300 GB index with millions of document, it did not make sense for us to chose a smaller instance type of Amazon CloudSearch.  Usually the base instance type can be selected based on the number and size of the documents you are planning to maintain in the Amazon CloudSearch. 
Note: Here we have chosen replication count as 5.  This is little strange in a distributed architecture because usually more replication count for the master decreases the speed of document upload. But when we were playing with Amazon CloudSearch we observed that it is increasing the speed of uploads. In addition we also observed the following :

  • If we keep the replication count 0 or less, use a smaller search instance type and pump documents in parallel from multiple nodes, either the Amazon CloudSearch Server is failing sometimes or error rates are high.
  • If we keep the replication count 0 or less , use a larger search instance type and pump documents in parallel from multiple nodes, internally Amazon Cloud Search itself is creating 3-5 nodes and it shows in the replication count. Waiting to discuss with AWS SA folks on this behavior.


We will be utilizing distributed uploading technique which we custom built using Amazon Elastic MapReduce to pump data to the Amazon CloudSearch server. This technique enables us to write more Index data in parallel.  

Step 2) Select how you would like to create the Amazon CloudSearch Schema: Here we have chosen Manual setup, since we already have schema to be migrated to Amazon CloudSearch.


Next step is to Add index fields to create your Amazon CloudSearch Schema configuration.

Step 3)Adding Amazon CloudSearch Index Fields: Once all the fields have been configured in the schema, click on continue button. In the schema file used we have 100+ fields to be indexed for this particular search domain.


Step 4) Review the setup configurations and launch:
We have 100+ Index fields with scaling options instance type as m2.2xlarge and replication count 5 in the "bigdatasearch" domain.


Step 5 ) Wait till the Amazon CloudSearch Infrastructure is provisioned for you on the back. Usually it takes 10 minutes, it will also list if there is any error encountered when creating the index fields.


Once the Amazon CloudSearch infrastructure is provisioned at the back end , you should notice the "bigdatasearch" domain is "Active". The search and Document endpoints are published and currently no of searchable document is "0". There is only 1 CloudSearch Index Partition (Shards) and 5 search.m2.2xlarge instances.


Step 6)Configuring Synonyms: We have 2+ MB of Synonyms which needs to be configured into the Amazon CloudSearch domain. For this, we used Cloud Search cli-toolkit to upload synonyms to Cloud Search.

cs-configure-analysis-scheme -d bigdatasearch --name customanalysisscheme --lang en -e cloudsearch.ap-southeast-1.amazonaws.com --synonyms customsynonyms.txt


Since the volume of index data is huge (300+ GB) we have created a Custom Data Loader built on Amazon Elastic MapReduce to pump the data in parallel into Amazon CloudSearch. Since it is built on Amazon Elastic MapReduce,  we can use the same program without modification for scale to upload TB's of index into the search system with hundreds of Data loader EMR core/task nodes. 

Step 7) Create Amazon Elastic MapReduce Data Loader Cluster Configuration:


Step 8) Configure the Elastic MapReduce (EMR) Capacity: We are using 10 M1.Large core node instances for uploading the data from inside AWS VPC. Depending upon the Data size (GB->TB) and Upload hours we can increase the EMR core nodes capacity and number to speed up the data pump (upload) process.


To know more about How Spot instances can save cost on Amazon EMR ? refer URL AWS Cost Saving Tip 12: Add Spot Instances with Amazon EMR

Step 9)Add Custom data loader program Jar to EMR: 
We have exported the data from a MSSQL server as flat UTF-8 dump file and stored it in Amazon S3. We are giving the 300+ GB Dump file as the input for the Amazon EMR CloudSearch Data Loader program to upload into Amazon CS in parallel. Buckets configurations of the Data Loader jar, Input, output and log files are configured in this screen


Step 10) Configure Amazon CloudSearch Access Policies:  We need to open Cloud Search security group access policies to accept upload requests from EMR cluster inside VPC. Configure static IP’s of all the instances or IP range of the data loader clients


Step 11)Run the Amazon Elastic MapReduce Data loader job :


Step 12) Analyzing the Amazon EMR Data loader Job Output:
Output of the JOB can be seen in the AWS EMR JOB logs. Here are few details:

  • “Map output records” in the log tells how many records are inserted into the Amazon CloudSearch , we can observe close to 247,681,520 documents(247+ million) are pumped.
  • “Bytes Read” in the output tells what is size of data set which the JOB has read. We can observe 322387978332 bytes which is equivalent to 300+ GB of index in the Amazon CloudSearch
  • The entire pumping process took ~30 hours with 10 m1.large core nodes for us. We observed that increasing the number of Data loader EMR nodes or their capacity improves the upload speed drastically.


Step 13) Clean up : Reset Replication Count to level of HA needed ideally 1-2 nodes. Once the Job is completed, Revert back the Security Access Policies in Amazon cloud search. Terminate the EMR Cluster and clean any leftover resources.

Step 14) Analyzing the CloudSearch Dashboard :
We observed that it takes some time for cloud search to reflect actual count of the indexed documents.
After the pumping of 300 + GB index you can observe that currently 2 Amazon CloudSearch partitions ( shards) are used to distribute 247+ million documents with 100+ index fields. This is tremendous cost savings compared to A9 powered Amazon CloudSearch. Amazon CloudSearch has automatically created shards based on the volume of data pumped in to the system. This is cool !!!, it reduces the maintenance headache of the infra admins. If the Amazon CloudSearch team can make this partition concept as configurable parameter in future it will be useful. 


Step 15) Executing a Sample Search queries: We are executing a some sample product search queries on the "bigdatasearch" domain to check whether everything is fine. Distributed query was fired and Results came Sub Second from one of the partitions.


In short, It is cost effective compared to old A9 powered CloudSearch, Automated scaling of replication counts for request scalability, automated scaling of partitions for data scalability relieves the infra admin headaches, strong apache Solr pedigree and its long list of feature additions in coming months will make it more interesting.  

After working with this service few weeks, we feel it is going to become the major search service on AWS in coming years, giving tough fight for Apache Solr and ElastiSearch deployments on EC2. 

This article was co authored with Ankit @8Kmiles.

Thursday, February 6, 2014

ElastiCache Redis : How to Backup & Launch from RDB Snapshots ?


ElastiCache Redis is a powerful KV store offering both in-memory and persistent store for Key Values.When we persist data in ElastiCache Redis, it is obvious that we need to constantly backup Redis to recover the data during failures. By default there is no option to easily create the snapshot from the running ElastiCache Redis cluster. We need to install Redis on Self Managed EC2 node and point it to ElastiCache Redis Master for the snapshot process. This post explains about the step by step method for Redis cluster snapshot creation.

Redis Snapshot Architecture :

  • ElastiCache cluster with master redis node of size cache.m1.large in AZ1 and Replication group with one read replica node of size cache.m1.large in AZ2
  • Self managed Redis installed on EC2 for snapshots on AZ1


Stage 1: Creating a Snapshot for ElastiCache redis Persistent store.

Step 1) Launch an EC2 instance on the same Availability zone where the ElastiCache Redis master node runs. 
If the Redis Snapshot EC2 node is temporary (or) replication/Backup performance is very critical then keep the Redis Snapshot node in the same AZ as the ElastiCache Redis Master Node.  
If Redis Snapshot node is going to permanently run and high availability of the backup mechanism is very critical, run this on different AZ from master redis node. 

Step 2)Download and install the Redis software on your newly launched EC2 instance. Make sure the Redis snapshot ec2 version and ElastiCache Redis Master version are compatible.
$ wget http://redis.googlecode.com/files/redis-2.6.4.tar.gz
$ tar xzf redis-2.6.4.tar.gz
$ cd redis-2.6.4
$ make


Step 3)Start the Redis Server on the newly launched EC2 instance. It will be listening on the port 6379
# src/redis-server 
[1513] 10 Jan 10:25:45.083 * Max number of open files set to 10032 
[1513] 10 Jan 10:25:45.085 # Server started, Redis version 2.6.4 


Step 4)Open another terminal window and connect locally to the Redis Snapshot EC2 instance 
# src/redis-cli -h localhost -p 6379 
redis localhost:6379> 


Step 5)To synchronize the data between the local Redis Snapshot EC2 instance and the ElastiCache Redis master use the following command in the Redis Snapshot EC2. 
SLAVEOF redissnapshot.qcdze2.0001.usw2.cache.amazonaws.com 6379

where "redissnapshot.qcdze2.0001.usw2.cache.amazonaws.com 6379" is the endpoint of the ElastiCache Master Redis node.
Bringing a Additional Redis EC2 node for snapshots into the infrastructure is not ideal. It adds extra cost and manual labor effort to setup, automate and manage this Redis Snapshot EC2. I hope AWS ElastiCache team will release a mechanism where we can easily take the snapshots from the ElastiCache Cluster itself. 
Note: Before this step ensure that security group permissions are opened between the Redis Snapshot EC2 and ElastiCache Redis Cluster.


Step 6)Once the synchronization is done between Redis Snapshot node and ElastiCache Redis Master, you can take snapshot using the command BGSAVE or SAVE in the snapshot EC2 Node. The snapshot file named "dump.rdb" is created in the disk.

Step 7) You can optionally detach it from the ElastiCache cluster by using the command on redis-cli  “SLAVEOF NO ONE”. This step is recommended if your redis cluster size is few GB's and you are backing up persistent data once/4 times a day, as you can save costs by not unnecessarily running your Redis snapshot EC2 instance for 24 hours and automatically bring it up whenever needed.

We conducted a small test to check whether all the above steps are successfully reflected. 

We pumped the ElastiCache Redis cluster with 1.8GB of Data spanning few hundred millions of KV data with each record in few <KB size. We observed the time taken to sync the data is about ~5 minutes on m1.large capacity in same AZ deployment. 

  • If your Redis is heavily used it is better to use Higher EC2 capacities for the ElastiCache Cluster and Snapshot node. Bigger the nodes, better the NW/IO and lesser the replication lag. 
  • If you are running a small cluster with few GB's then creating the Redis Snapshot Node on demand will save costs. If your cluster is big, data is critical and backup frequencies are less, then run Snapshot EC2 node continuously for better performance.


The replication action with timing is detailed below:
[1595] 10 Jan 11:03:06.676 # Server started, Redis version 2.6.4 
[1595] 10 Jan 11:03:06.676 * The server is now ready to accept connections on port 6379 
[1595] 10 Jan 11:03:18.018 * SLAVE OF redissnapshot.qcdze2.0001.usw2.cache.amazonaws.com:6379 enabled (user request) 
[1595] 10 Jan 11:03:18.779 * Connecting to MASTER... 
[1595] 10 Jan 11:03:18.975 * MASTER <-> SLAVE sync started 
[1595] 10 Jan 11:03:18.975 * Non blocking connect for SYNC fired the event. 
[1595] 10 Jan 11:03:18.977 * Master replied to PING, replication can continue... 
[1595] 10 Jan 11:06:03.949 * MASTER <-> SLAVE sync: receiving 1943998490 bytes from master 
[1595] 10 Jan 11:08:13.348 * MASTER <-> SLAVE sync: Loading DB in memory 
[1595] 10 Jan 11:09:37.430 * MASTER <-> SLAVE sync: Finished with success 
[1595] 10 Jan 11:09:37.441 * 100 changes in 300 seconds. Saving... 
[1595] 10 Jan 11:09:39.970 * Background saving started by pid 1635 
[1595] 10 Jan 11:16:44.860 # User requested shutdown... 
[1595] 10 Jan 11:16:44.860 * Saving the final RDB snapshot before exiting. 
[1595] 10 Jan 11:19:10.270 * DB saved on disk 
[1595] 10 Jan 11:19:10.270 # Redis is now ready to exit, bye bye... 

Test whether the same key values are synced between Master Redis Node in ElastiCache Cluster and Redis Snapshot EC2. The below steps illustrate the same: 
# src/redis-cli -h redissnapshot.qcdze2.0001.usw2.cache.amazonaws.com -p 6379 

redis redissnapshot.qcdze2.0001.usw2.cache.amazonaws.com:6379> get 100sent 
"1001234567890123456789012345678901234567890abcdefghijklmopqrstuvwxyz"

redis redissnapshot.qcdze2.0001.usw2.cache.amazonaws.com:6379> get 10sent 
"101234567890123456789012345678901234567890abcdefghijklmopqrstuvwxyz"


Important Observation:
Always sync the Redis Snapshot EC2 node with the ElastiCache Redis master node and not with the read slave in the redis replication group. Following error will be displayed when trying to sync with the slave. 
#Connecting to MASTER...
#MASTER <-> SLAVE sync started
#Non blocking connect for SYNC fired the event.
#Master replied to PING, replication can continue...
# MASTER aborted replication with an error: ERR Can't SYNC with a slave


We tried the above approach to check whether we can reduce the workload on Redis Master node and take the backups from Slave redis Nodes. As AWS as rightly named it is " Redis Read Replica Nodes" and you cannot use it for snapshot replication. 

Stage 2: Launching ElastiCache Redis Cluster from the existing Snapshot taken above.

Step 1) Import the data to the S3 bucket (redisaws) and assign open/download permission for the email id aws-scs-s3-readonly@amazon.com. Note : The aws-scs-s3-readonly account is used exclusively for customers uploading Redis snapshot data from Amazon S3.

Step 2) Launch a new ElastiCache Redis cluster from the "dump.rdb" snapshot taken in the earlier stage 1 - step 6 from Redis Snapshot node. Lets understand what is RDB in detail.

  • RDB is a very compact single file point in time representation of your Redis data and are perfect for backups. Being a single compact file it can be transferred to alternate AZ and AWS regions quite fast and is ideal during outages/DR. RDB also allows faster restarts of Redis Master with big datasets in new ElastiCache Clusters nodes. Both these points helps us achieve better RPO and RTO during DR scenario using RDB. 
  • RDB needs to fork() often in order to persist on disk using a child process. Fork() can be time consuming if the dataset is big, and may result in Redis Master to stop serving clients for some millisecond or even for one second if the dataset is very big and the CPU performance is not great. Also since the Redis Snapshot instance in this architecture is not used for accepting reads/writes and it is primarily used only for replication + snapshot it will add again minimal load on the master node during replication. Factor the ElastiCache Master Redis node capacity taking both these parameters into consideration.
  • Note : RDB is NOT good if you need to minimize the chance of data loss in case Redis Master stops working. It is suggested to use RDB model with ElastiCache Redis Replication group cluster for better Availability and integrity.


Step 3) Once the ElastiCache cluster is launched. Connect to the cluster endpoint and check for the existence of the same key values tested in the dump.


src/redis-cli -h rds.qcdze2.0001.usw2.cache.amazonaws.com -p 6379 

redis rds.qcdze2.0001.usw2.cache.amazonaws.com:6379> get 10sent 
"101234567890123456789012345678901234567890abcdefghijklmopqrstuvwxyz" 

redis rds.qcdze2.0001.usw2.cache.amazonaws.com:6379> get 100sent 
"1001234567890123456789012345678901234567890abcdefghijklmopqrstuvwxyz" 
You can notice from the above that the key values are same and the new ElastiCache node was created properly with original data.


This post was co authored with Senthil 8K Miles


Monday, January 20, 2014

Architecting Highly Available ElastiCache Redis replication cluster in AWS VPC

In this post lets explore how to architect and create a Highly Available + Scalable Redis Cache Cluster for your web application in AWS VPC. Following is the architecture in which the ElastiCache Redis Cluster is assembled:

  • Redis Cache Cluster inside Amazon VPC for better control and security
  • Master Redis Node 1 will be created in AZ-1 of US-West
  • Redis Read Replica Node 2 will be created in AZ-2 of US-West
  • Redis Read Replica Node 3 will be created in AZ-3 of US-West


You can position all the 3 Redis Nodes in different Availability zones for Achieving High Availability (or) you can position Master + RR 1 in AZ1 and RR 2 in AZ2. This reduces the Inter - AZ latency and might give better performance for heavily used clusters.
Step 1: Creating Cache Subnet groups:
To create Cache Subnet group  navigate to the dashboard of ElastiCache, select Cache Subnet groups and then click "Create Cache Subnet group". Add the Subnet Id and the Availability Zone you need to use for the ElastiCache cluster.
We have created Amazon VPC spreading across 3 availability zones. In this post we are going to place the Redis Master and 2 Redis Replica Slaves in these 3 availability zones. Since Redis will be most of the times accessed by your application tier it is better if you place them on Private Subnet of your VPC.
Step 2: Creating Redis Cache Cluster: 
To create Cache Cluster navigate to the  dashboard of ElastiCache, select Launch Cache Cluster and provide the necessary details. We are launching it inside Amazon VPC, so we have to select the Cache Subnet group .
Note: It is mandatory to create Cache Subnet group before Launch if you need ElastiCache Redis cluster in Amazon VPC.
For test purposes i have used m1.small EC2 instance for the Redis. Since this is a fresh Redis installation, i have not mentioned S3 bucket from where the persistent Redis Snapshot will be used as input. On successful creation of the Cache Cluster you can see the details in the dashboard.
Step 3: Replication Group Creation:
To create Replication group select the option of Replication Groups from dashboard and then select the “Create Replication Group”

Select the master Redis node "redisinsidevpc" created previously as the primary cluster id of the Cache cluster.  Give the Replication group id and description as illustrated below.
Note: Replication Group should be created only after the Primary Cache Cluster node is UP and running, else you will get the error as shown below.
On the successful creation of the Replication group you can see the following details. You can observe from below screenshot that there is only one primary node in US-WEST-2A and zero Redis Read Replica's are attached to it.

Step 4: Adding Read Replica Nodes:
When you select the Replication group, you can see the option to add Redis Read Replica. We are adding 2 Redis Read Replica named Redis-RR1 (in US-West-2B) and Redis-RR2 (in US-WEST-2C). Both the Read replica's are pointed to the master node "redisinsidevpc". Currently we can add up to 5 Read replica Nodes for a Redis Master Node. This is more than enough to handle Thousands of messages per second. If you combine it with Redis Pipeline handling 100K messages per second from a node is like cake walk.
Adding Read Replica 1 in Us-West -2B
Adding Read Replica 2 in US-West-2c

On successful creation you can see the following details of Replication group in the dashboard. Now you can see there are 3 Redis nodes listed with Number of read Replica's as 2. Placing the Read Replica's and master node in multiple AZ will increase the high availability and protects you from node and AZ level failure. On our sample tests inter AZ Replication deployments had <2 second replication lag for massive writes on master and <1 second replication lag between master slave inside same AZ deployments. We pumped @100K messages per second for few minutes on m1.large Redis instance cluster. 
In event, if you need additional read scalability i recommend to use more read Replica slaves added to the master. 
In your application tier you need to use the primary Endpoint "redis-replication.qcdze2.0001.usw2.cache.amazon.aws.com:6379" shown below to connect to Redis. 
If you need to delete/reboot/Modify you can make it through the options available here.
Step 5: Promoting the Read replica:
You can also promote any node as the Primary cluster using the Promote/Demote option. There will be only one Primary Node.
Note: This step is not part of the cluster creation process.


This promotion has to be carried out with caution and proper understanding for maintaining data consistency. 

Post was co authored with Senthil 8KMiles

Other related posts:

Billion Messages - Art of Architecting scalable ElastiCache Redis tier

Need Consulting help ?

Name

Email *

Message *

DISCLAIMER
All posts, comments, views expressed in this blog are my own and does not represent the positions or views of my past, present or future employers. The intention of this blog is to share my experience and views. Content is subject to change without any notice. While I would do my best to quote the original author or copyright owners wherever I reference them, if you find any of the content / images violating copyright, please let me know and I will act upon it immediately. Lastly, I encourage you to share the content of this blog in general with other online communities for non-commercial and educational purposes.

Followers