Showing posts with label Best practices. Show all posts

Friday, June 12, 2015

27 Best Practice Tips on Amazon Web Services Security Groups

AWS Security Groups are one of the most used and abused configurations inside an AWS environment if you are using them on cloud quite long. Since AWS security groups are simple to configure, users many times ignore the importance of it and do not follow best practices relating to it. In reality, operating on AWS security groups every day is much more intensive and complex than configuring them once. Actually, nobody talks about it! So in this article, I am going to share our experience in dealing with AWS Security groups since 2008 as a set of best practice pointers relating to configuration and day to day operations perspective.
In the world of security, proactive and reactive speed determines the winner. So a lot of these best practices should be automated in reality. In case your organizations' Dev/Ops/Devops teams needs help with security group best practices automation, feel free to contact me.

AWS released so many features in the last few years relating to Security, that we should not visualize Security groups in isolation, It just does not make sense anymore. The Security Group should always be seen in the overall security context, with this I start the pointers.

Practice 1:  Enable AWS VPC Flow Logs for your VPC or Subnet or ENI level. AWS VPC flow logs can be configured to capture both accept and reject entries flowing through the ENI and Security groups of the EC2, ELB + some more services. This VPC Flow log entries can be scanned to detect attack patterns,alert abnormal activities and information flow inside the VPC and provide valuable insights to the SOC/MS team operations.

Practice 2: Use AWS Identity and Access Management (IAM) to control who in your organization has permission to create and manage security groups and network ACLs (NACL). Isolate the responsibilities and roles for better defense. For example, you can give only your network administrators or security admin the permission to manage the security groups and restrict other roles.

Practice 3: Enable AWS Cloud Trail logs for your account. The AWS Cloud Trail will log all the security group events and it is needed for management and operations of security groups. Event streams can be created from AWS Cloud Trail logs and it can be processed using AWS Lambda. For example : whenever a Security Group is deleted , this event will be captured with details on the AWS Cloud Trail logs. Events can be triggered in AWS Lamdba which can process this SG change and alert the MS/SOC on the dashboard or email as per your workflow. This is a very powerful way of reacting to events within span of <7 minutes. Alternatively, you can process the AWS Cloud Trail logs stored in your S3 every X frequency as a batch and achieve the above. But the Operation teams reaction time can vary depending on generation and polling frequency of the AWS Cloud Trail logs. This activity is a must for your operations team.

Practice 4: Enable AWS App Config for your AWS account. App records all events related to your security group changes and can even send emails.

Practice 5: Have proper naming conventions for the Amazon Web Services security group. The naming convention should follow a enterprise standards. For example it can follow the notation: "AWS Region+ Environment Code+ OS Type+Tier+Application Code"
Security Group Name - EU-P-LWA001
AWS Region ( 2 char ) = EU, VA, CA etc
Environment Code (1 Char)  = P-Production , Q-QA, T-testing, D-Development etc
OS Type (1 Char)= L -Linux, W-Windows etc
Tier (1 Char)= W-Web, A-App, C-Cache, D-DB etc
Application Code ( 4 Chars) = A001
We have been using Amazon Web Services from 2008 and found over the years managing the security groups in multiple environments is itself a huge task. Proper naming conventions from beginning is a simple practice, but will make your AWS journey manageable.

Practice 6: For security in depth, make sure your Amazon Web Services security groups naming convention is not self explanatory also make sure your naming standards stays internal. Example : AWS security group named UbuntuWebCRMProd is self explanatory for hackers that it is a Production CRM web tier running on ubuntu OS. Have an automated program detecting AWS security groups with Regex Pattern scanning of AWS SG assets periodically for information revealing names and alert the SOC/Managed service teams.

Practice 7: Periodically detect, alert or delete AWS Security groups not following the organization naming standards strictly. Also have an automated program doing this as part of your SOC/Managed service operations.  Once you have this stricter control implemented then things will fall in line automatically.

Practice 8: Have automation in place to detect all EC2,ELB and other AWS assets associated with Security groups. This automation will help us to periodically detect Amazon Web Services Security groups lying idle with no associations, alert the MS team and cleanse them. Unwanted security groups accumulated over time will create unwanted confusion.

Practice 9: In your AWS account, when you create a VPC, AWS automatically creates a default security group for the VPC. If you don't specify a different security group when you launch an instance, the instance is automatically associated with the appropriate default security group. It will
allow inbound traffic only from other instances associated with the "default" security group and allow all outbound traffic from the instance. The default security group specifies itself as a source security group in its inbound rules. This is what allows instances associated with the default security group to communicate with other instances associated with the default security group. This is not a good security practice. If you don't want all your instances to use the default security group, you can create your own security groups and specify them when you launch your instances. This is applicable to EC2 , RDS , ElastiCache and some more services in AWS. So detect "default" security groups periodically and alert to the SOC/MS.

Practice 10: Alerts by email and cloud management dash board should be triggered whenever critical security groups or rules are added/modified/deleted in production.  This is important for reactive action of your managed services/security operations team and audit purpose.

Practice 11 : When you associate multiple security groups with an Amazon EC2 instance, the rules from each security group are effectively aggregated to create one set of rules. AWS uses this set of rules to determine whether to allow access or not. If there is more than one SG rule for a specific port, AWS applies the most permissive rule. For example, if you have a rule that allows access to TCP port 22 (SSH) from IP address 203.0.113.10 and another rule that allows access to TCP port 22 for everyone, then everyone will have access to TCP port 22 because permissive takes precedence.
Practice X.1 : Have automated programs detecting EC2 associated with multiple SG/rules and alert the SOC/MS periodically. Condense the same manually to 1-3 rules max as part of your operations.
Practice X.1 : Have automated programs detecting conflicting SG/rules like restrictive+permissive rules together and alert the SOC/MS periodically.

Practice 12 : Do not create least restrictive security groups like 0.0.0.0/0 which is open to every one.
Since web servers can receive HTTP and HTTPS traffic open, only their SG can be permissive like
0.0.0.0/0,TCP, 80, Allow inbound HTTP access from anywhere
0.0.0.0/0,TCP, 443, Allow inbound HTTPS access from anywhere
All least restrictive SG created in your account should be alerted to SOC/MS teams immediately.

Practice 13: Have a security policy not to launch servers with default ports like 3306, 1630, 1433, 11211, 6379 etc. If the policy has to be accepted, then security groups also have to be created on the new hidden listening ports instead of the default ports. This provides a small layer of defense, since one cannot infer the information from the security group port on the EC2 service it is protecting. Automated detection and alerts should be created for SOC/MS, if security groups are created with default ports.

Practice 14: Applications which require stricter compliance requirements like HIPAA, PCI etc to be met need end to end transport encryption to be implemented on server back end in AWS. The communication from ELB to Web->App->DB->Others tiers need to be encrypted using SSL or HTTPS. This means only secured ports like 443, 465, 22 are permitted in corresponding EC2 security groups. Automated detection and alerts should be created for SOC/MS if security groups are created on secure ports for regulated applications.

Practice 15: Detection , alert and actions can be taken by parsing the AWS Cloud Trail logs based on usual patterns observed in your production environment
Example:
15.1 :If a port was opened and closed in <30 or X mins in production can be a candidate for suspicious activity if it is not normal pattern for your production
15.2 :If a permissive Security Group was created and closed in <30 or X mins can be a candidate for suspicious activity if it is not the normal pattern for your production
Detect anomalies on how long a change effected and reverted in security groups in production.

Practice 16: In case ports have to be opened in Amazon Web Services security groups or a permissive AWS security group needs to be applied, Automate this entire process as part of your operations such that a security group is open for X agreed minutes and will be automatically closed aligning with your change management. Reducing manual intervention avoids operational errors and adds security.

Practice 17: Make sure SSH/RDP connection is open in AWS Security Group only for jump box/bastion hosts for your VPC/subnets. Have stricter controls/policies avoid opening SSH/RDP to other instances of production environment. Periodically check , alert and close for this loop hole as part of your operations.

Practice 18: It is a bad practice to have SSH open to the entire Internet for emergency or remote support. By allowing the entire Internet access to your SSH port there is nothing stopping an attacker from exploiting your EC2 instance. The best practice is to allow very specific IP address in your security groups, this restriction improves the protection. This could be your office or on premise or DC through which you connect your jump box.

Practice 19: Too much or Too less: How many security groups for a usual multi tiered web app is preferred is a frequently asked question ?
Option 1 : One security group cutting across multiple tiers is easy to configure, but it is not a recommended for secure production applications.
Option 2: One Security group for every instance is too much protection and tough to manage operationally on longer term
Option 3: Individual Security group for different tiers of the application, For example : Have separate security groups for ELB, Web , App, DB and Cache tiers of your application stack.
Periodically check whether Option 1 type rule is being created in your production and alert the SOC/MS.

Practice 20: Avoid allowing  UDP or ICMP for private instances in Security groups. Not a good practice unless specifically needed.

Practice 21: Open only specific ports, Opening range of ports in a security group is not a good practice. In the security group you can add many inbound ingress rules, While opening the ports it is always advised to open for specific ports like 80,443, etc rather than range of ports like 200-300.


Add rules for communication between associated instances

Practice 22: Private Subnet instances can be accessed only from the VPC CIDR IP range. Opening instances to the public IP ranges is a possibility , but it does not make any sense. E.g., Opening HTTP to 0.0.0.0/0 in the SG of the private subnet instance does not make any sense. So detect and cleanse such rules.

Practice 23: AWS CloudTrail log captures the events related security. AWS lambda events or automated programs should trigger alerts to operations when abnormal activities are detected. For example:
23.1:Alert when X number of SG were added/deleted at "Y" Hours or Day by IAM user / Account
23.2:Alert when X number of SG Rules were added/deleted at "Y" Hours or Day by IAM user / Account

Practice 24: In case you are an enterprise make sure all security groups related activities of your production are part of your change management process. Security Group actions can be manual or automated with your change management in an enterprise.
In case you are an agile Startup or SMB and do not have complicated Change management process, then automate most of the security group related tasks and events as illustrated above on various best practices. This will bring immense efficiency into your operations

Practice 25: Use outbound/egress security groups wherever applicable within your VPC. Restrict FTP connection to any server on the Internet from your VPC. This way you can avoid data dumps and important files getting transferred out from your VPC. Defend harder and make it tougher !

Practice 26: For some tiers of your application, use ELB in front your instance as a security proxy with restrictive security groups - restrictive ports and IP ranges. This doubles your defense but increases the latency.

Practice 27: Some of the tools we use in conjunction to automate and meet above best practices are ServiceNow, Amazon CFT, AWS API'S, Rundeck, Puppet, Chef, Python , .Net and Java automated programs.

Note : In case your organizations Dev/Ops/Devops teams needs help on security group best practices automation on points listed above, feel free to contact me harish11g.aws@gmail.com

Wednesday, August 27, 2014

Billion Messages - Art of Architecting scalable ElastiCache Redis tier


Whenever we are designing a highly scalable architectures on AWS running thousands of application servers and supporting millions of requests, usage of NoSQL solutions have become inevitable part. One such solution we often been using for years on AWS is Redis . We love Redis. 
AWS introduced ElastiCache Redis on 2013 and we started using the same since it eased the management and operational efforts.  In this article i am going to share my experience on designing large scale Redis tiers supporting billions of messages per day on AWS, step by step guide on how to deploy the same, what are the Implications you face at scale ? Best Practices to be adopted while designing sharded+replicated Redis Tiers etc.

Since we need to support billions of message requests per day and it was growing:

  • the ElastiCache Redis tier was designed with Partitions( shards) to scale out as the customer grows
  • the ElastiCache Redis tier was designed with Replica Slaves for HA and read scaling as the read volumes grow

When your application is growing at Rapid pace and lots of data are created every day, you cannot keep increasing (scaling up) the size of the ElastiCache Node. At one point you will hit the maximum memory capacity of your EC2 instance and you will be forced to partition.  Partitioning is the process of splitting your Key Value data into multiple ElastiCache Redis instances, so that every instance will only contain a subset of your Key Value pair. It allows for much larger ElastiCache Redis data stores, using the sum of the memory of many ElastiCache Redis Nodes. It also allows to scale the computational power to multiple cores and multiple EC2, and the network bandwidth to multiple EC2 network adapters. There are two widely used partition/shard implementation techniques that are available for ElastiCache Redis Tier :
Technique 1) Client side partitioning means that the Redis clients directly select the right ElastiCache Redis node where to write or read a given key. Many Redis clients implement client side partitioning, chose the right one wisely.
Technique 2) Proxy assisted partitioning means that your clients send requests to a proxy that is able to speak the Redis protocol, which in turn sends requests directly to the right ElastiCache Redis instance. The proxy will make sure to forward our request to the right Redis instance accordingly to the configured partitioning schema. Currently the most widely used Proxy assisted partitioning tool is Twemproxy , written by Manju Raj of twitter. Git hub link https://github.com/twitter/twemproxy . Twemproxy is a proxy developed at Twitter for the Memcached ASCII and the Redis protocol. Twemproxy supports automatic partitioning among multiple Redis instances and  currently it is the suggested way to handle partitioning with Redis.
In this article we are going to explore in detail about Proxy assisted partitioning technique for highly scalable and available Redis tier.

Welcome to Twemproxy
Twemproxy( nutcracker) is a fast single-threaded proxy supporting the Memcached ASCII protocol and more recently the Redis protocol.

Installing Twemproxy:
Download the Twemproxy package.
wget http://twemproxy.googlecode.com/files/nutcracker-0.3.0.tar.gz
tar -xf nutcracker-0.3.0.tar.gz
cd nutcracker-0.3.0
./configure
make
make install

Configuration:
Twemproxy (Nutcracker) can be configured through a YAML file specified by the -c or --conf-file command-line argument on process start. The configuration file is used to specify the server pools and the servers within each pool that nutcracker manages. The configuration files parses and understands the following keys:

listen: The listening address and port (name:port or ip:port) for this server pool.
hash: The name of the hash function.
hash_tag: A two character string that specifies the part of the key used for hashing. Eg "{}" or "$$". Hash tag enable mapping different keys to the same server as long as the part of the key within the tag is the same.
distribution: The key distribution mode.
timeout: The timeout value in msec that we wait for to establish a connection to the server or receive a response from a server. By default, we wait indefinitely.
backlog: The TCP backlog argument. Defaults to 512.
preconnect: A boolean value that controls if nutcracker should preconnect to all the servers in this pool on process start. Defaults to false.
redis: A boolean value that controls if a server pool speaks redis or memcached protocol. Defaults to false.
server_connections: The maximum number of connections that can be opened to each server. By default, we open at most 1 server connection.
auto_eject_hosts: A boolean value that controls if server should be ejected temporarily when it fails consecutively server_failure_limit times. See liveness recommendations for information. Defaults to false.
server_retry_timeout: The timeout value in msec to wait for before retrying on a temporarily ejected server, when auto_eject_host is set to true. Defaults to 30000 msec.
server_failure_limit: The number of consecutive failures on a server that would lead to it being temporarily ejected when auto_eject_host is set to true. Defaults to 2.
servers: A list of server address, port and weight (name:port:weight or ip:port:weight) for this server pool.

For More details Refer: https://github.com/twitter/twemproxy

Running and Accessing Twemproxy 
To start the proxy just use the command “nutcracker” with the configuration file path specified or in its default path(conf/nutcracker.yml) .
Based on the configuration the twemproxy will be running and listening. Configure your application to point to the port and address instead of the Redis cluster.

Twemproxy Deployment models:

We usually deploy Twemproxy one one of the following models in AWS :
Model 1: Twemproxy as a separate Proxy Tier: In this model Twemproxies are deployed in separate EC2 instances, The application tier is configured to point to Twemproxies . The Twemproxy tier in turn maintains the mappings to the ElastiCache redis nodes. It is better to use instances with very good IO bandwidth for twemproxy tier in AWS. In case you feel the instance CPU is underutilized, you can launch multiple Twemproxy instances inside the same single EC2 instance as well.

Though the above model looks clean and efficient there are optimizations that can be applied to this architecture :
What happens when the twemproxy01 fails, how will the Application server instances know about it ?
Why should i pay additional for twemproxy EC2 instances, Can it be minimized ?

Model 2 : Twemproxy bundled with application tier EC2's: In this model twemproxies are bundled in the same box of the application server EC2 itself. Since two twemproxies are not aware of each others existence, it is easy to architect this model even in App->Auto Scaling mode. Every application server talks to the local twemproxy deployed in the same box this saves cost and avoids managing additional tier complexity as well.

Reference ElastiCache Redis + Twemproxy  deployment:
(This is a Reference deployment, the same can be scaled out to hundreds depending upon the need. It is a Redis Partitioned + replicated setup )
1. Two ElastiCache Redis nodes in AWS (twem01 and twem02)
2. Replication group for each ElastiCache redis nodes (twem01-rg and twem02-rg with one Read Replica each)
3. Two twemproxy servers running in separate EC2. (twemproxy01 and twemproxy02)
Once the above setup is done please note down the endpoints. We will be using the Replication group endpoint as the ElastiCache Redis endpoint for the twemproxy.

ElastiCache Redis Endpoints:
twem01-twem01.qcdze2.0001.usw2.cache.amazonaws.com:6379
twem02-twem02.qcdze2.0001.usw2.cache.amazonaws.com:6379
ElastiCache Redis Replication endpoints:
twem01-rg.qcdze2.ng.0001.usw2.cache.amazonaws.com:6379
twem02-rg.qcdze2.ng.0001.usw2.cache.amazonaws.com:6379


To test the Twemproxy we pumped following keys:
Pump KV data through the Twemproxy01 (1-2000 keys)
Pump KV data through the Twemproxy02(2001-4000 keys).


Configuration:
beta:
  listen: 127.0.0.1:22122
  hash: fnv1a_64
  hash_tag: "{}"
  distribution: ketama   #Consistent Hashing
  auto_eject_hosts: false
  timeout: 5000
  redis: true
  servers:
- twem01-rg.qcdze2.ng.0001.usw2.cache.amazonaws.com:6379:1 server1
- twem02-rg.qcdze2.ng.0001.usw2.cache.amazonaws.com:6379:1 server2

Test 1: Testing Key accessibility . Testing "GET" operation across both the Twemproxy Instances for few sample keys. 

Fetch 4 Keys spread across 4000 KV data from Twemproxy01  EC2 instance:
[root@twemproxy01 redish]# src/redis-cli -h 127.0.0.1 -p 22122
redis 127.0.0.1:22122> get 1000
"1000-data"
redis 127.0.0.1:22122> get 2000
"2000-data"
redis 127.0.0.1:22122> get 3000
"3000-data"
redis 127.0.0.1:22122> get 4000
"4000-data"
Fetch 4 Keys spread across 4000 KV data from Twemproxy02  EC2 instance:
[root@twemproxy02 redish]# src/redis-cli -h 127.0.0.1 -p 22122
redis 127.0.0.1:22122> get 1000
"1000-data"
redis 127.0.0.1:22122> get 2000
"2000-data"
redis 127.0.0.1:22122> get 3000
"3000-data"
redis 127.0.0.1:22122> get 4000
"4000-data"

From the above test it is evident that all 4000 KV data inserted using both Twemproxies are accessible from both Twemproxies( testing the sample) even though they are not aware among themselves. This is because of the same hashing and Key mapping translation done at Twemproxy level.

Test 2: Testing the ElastiCache Redis Availability and Fail over mechanism:

We are going to promote the twem01-rg replication group read replica to be the Primary Redis Node. After promotion we are going to test:


  1. Whether the Twemproxy is able to recognize the newly promoted master
  2. Whether the sample KV data is safely replicated and still accessible , to ensure failover is successful.

To promote ElastiCache Redis slave just click the promote Action and confirm or automate using API. During the promotion of Read Replica to master we observed that the transition happens very quickly and there is no timeout but the response time for the query is about 4-5 secs for about 3-4 minutes during the switch over. In the Twemproxy configuration we can set the timeout configuration, this value needs to be set accordingly so that during switch over there will be no connection refused. For the sample test we have set it as 5000


Repeat Test 1:
[root@twemproxy01 redish]# src/redis-cli -h 127.0.0.1 -p 22122
redis 127.0.0.1:22122> get 1000
"1000-data"
redis 127.0.0.1:22122> get 2000
"2000-data"
redis 127.0.0.1:22122> get 3000
"3000-data"
redis 127.0.0.1:22122> get 4000
"4000-data"
Fetch 4 Keys spread across 4000 KV data from Twemproxy02  EC2 instance:
[root@twemproxy02 redish]# src/redis-cli -h 127.0.0.1 -p 22122
redis 127.0.0.1:22122> get 1000
"1000-data"
redis 127.0.0.1:22122> get 2000
"2000-data"
redis 127.0.0.1:22122> get 3000
"3000-data"
redis 127.0.0.1:22122> get 4000
"4000-data"
From the above test it is evident that all 4000 KV data are replicated properly between master and slaves nodes and the transition between slave to master happened successfully with all the data.
Reporting
Nutcracker exposes stats at the granularity of server pool and servers per pool through the stats monitoring port. The stats are essentially JSON formatted key-value pairs, with the keys corresponding to counter names. By default stats are exposed on port 22222 and aggregated every 30 seconds.

Some best practices while designing highly scalable+available ElastiCache Redis Tier :

Practice 1 : Reduce the Number of Connections and pipeline messages:
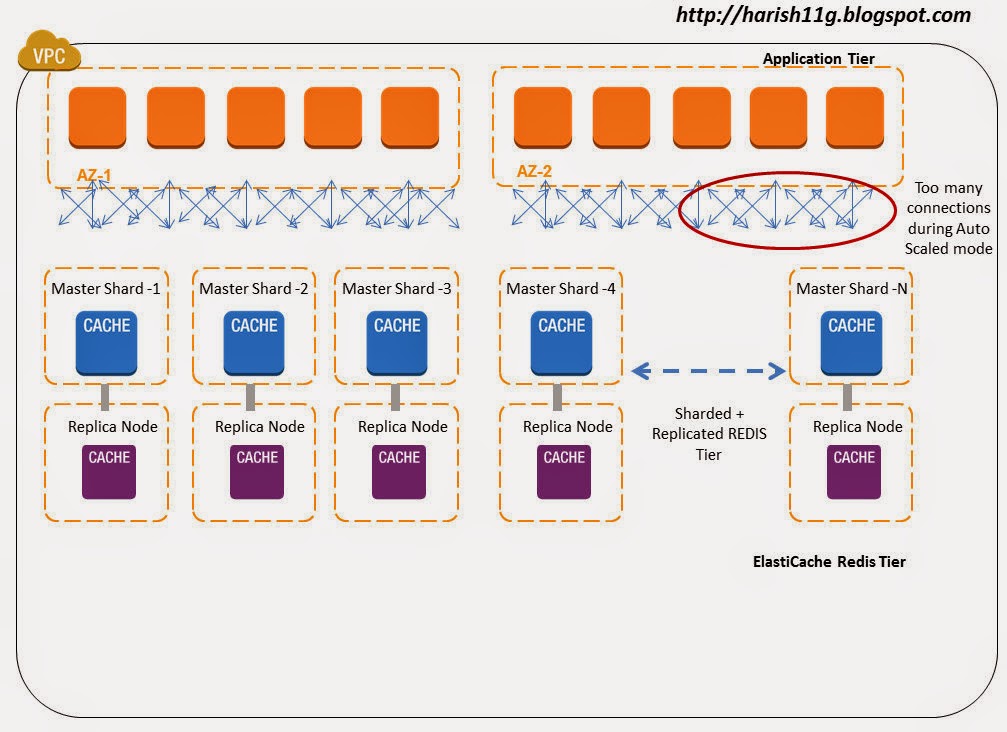
Whenever the application instance gets a request to get/put value to the ElastiCache redis node, the client makes a connection to the Redis Tier. Imagine it is a heavy traffic site, then thousands of requests hitting translates to thousands of connections from the application instance to Redis Tier. Now when you add Auto- scaling to your application tier and you have few hundred servers scaled out , then imagine the connection complexity and overhead this architecture brings to the ElastiCache Redis Tier.
Best practice is minimize the number of connections made from your application instance to your ElastiCache redis node. Use Twemproxy in bundled mode with Application EC2 instance, this keeps the process in close proximity and reduces the connection overhead.  Secondly, Twemproxy internally uses minimal connections to ElastiCache Redis Instance by proxying multiple client connections onto one or few server connections.
Redis also supports pipelines, where multiple requests can be pipelined and sent on a single connection. In a simple test using large Application & ElastiCache node we were able to process 125K message/sec in pipeline mode, now imagine what you could achieve on bigger instance types on AWS. The connection minimization architectural setup of twemproxy makes it ideal for pipelining requests and responses and hence saving on the round trip time.  For example, if twemproxy is proxying three client connections onto a single server and we get requests - 'get key\r\n', 'set key 0 0 3\r\nval\r\n' and 'delete key\r\n' on these three connections respectively, twemproxy would try to batch these requests and send them as a single message onto the server connection.

Note : It is important to note that "read my last write" constraint doesn't necessarily hold true when twemproxy is configured with server_connections: > 1. Let us consider a scenario where twemproxy is configured with server_connections: 2. If a client makes pipelined requests with the first request in pipeline being set foo 0 0 3\r\nbar\r\n (write) and the second request being get foo\r\n (read), the expectation is that the read of key foo would return the value bar. However, with configuration of two server connections it is possible that write and read request are sent on different server connections which would mean that their completion could race with one another. In summary, if the client expects "read my last write" constraint, you either configure twemproxy to use server_connections:1 or use clients that only make synchronous requests to twemproxy.

Practice 2:  Configure Auto Ejection and Hashing combination properly
Design for failure is the mantra of cloud architecture. Failures are commons when things are distributed on scale. Though partitioning when using ElastiCache Redis as a data store or cache is conceptually the same on broad lines, there is a huge difference operationally on large scale systems. When you are using ElastiCache Redis as a data store you need to be sure that a given key always maps to the same instance, Whereas if you are using  ElastiCache Redis as cache if a given node is not available, then you can always start afresh using a different node in the hash ring with consistent hashing implementations.
To be resilient against failures, it is recommended that you configure Auto eject hosts false when you treat redis as a Data Store and true in when you treat redis as a cache.
resilient_pool:
  auto_eject_hosts: true
  server_retry_timeout: 30000
  server_failure_limit: 3
Enabling auto_eject_hosts: This property ensures that a dead ElastiCache redis Node can be ejected out of the hash ring after server_failure_limit: consecutive failures have been encountered on that node. A non-zero server_retry_timeout: ensures that we don't incorrectly mark a node as dead forever especially when the failures were really transient. The combination of server_retry_timeout: and server_failure_limit: controls the tradeoff between resiliency to permanent and transient failures.
Note that an ejected node will not be included in the hash ring for any requests until the retry timeout passes. This will lead to data partitioning as keys originally on the ejected node will now be written to another node still in the pool. If ElastiCache Redis is used as a cache (in memory) then in event of a Redis Node going down, the cache data will be lost. This cache miss can cascade performance problems to other tiers and altogether bring down your system on the cloud. To minimize KV cache miss,  you can design your hash ring with Ketama hashing on the Redis Proxy. This will minimize the Cache miss in event of cache node failure, also it decreases the overall re-balancing needed in your Redis tier.  In addition to helping hand on availability problems, Redis Proxy+Ketama can also help your Redis farm to Scale out and Scale down easily with minimal cache miss. To know more about Ketama on ElastiCache refer http://harish11g.blogspot.com/2013/01/amazon-elasticache-memcached-internals_8.html  . The below diagram illustrates a ElastiCache Redis Cache Farm with Consistent Hash Ring.


In short to minimize the cache miss when using auto eject with true it is recommended to use "Ketama Hashing ( Consistent Hashing Algorithm)" on your Twemproxy configuration. 


ElastiCache Redis as a Data Store:
What if the data stored in your Cache is important and needs to persisted across node failures and launch ? What if the date stored in your Cache cannot be lost and it needs to be replicated and promoted during failures?
Welcome to ElastiCache Redis as Data store. ElastiCache Redis offers features to persist the in memory cache data to disk and also replicate it to a slave for high availability. If ElastiCache Redis is used as a store (persistent), you need to keep the map between keys and nodes fixed, and a fixed number of nodes. Since the data stored is important when you treat ElastiCache Redis as a data store, in event one Redis node goes down, you should have immediate standby up and running in minutes.  You can architect ElastiCache Redis master with one or more replication Slave launched on different AZ from Master for High Availability in AWS. In event master node failure or master AZ failure, the slave Redis node can be promoted in minutes to act as master. This whole High availability design keeps the number of nodes on the hash ring stable and simple, Otherwise, you will end up building a system to re balance the keys (which is not easy) between nodes whenever there is a addition or removal of nodes during outages. In addition to above the ElastiCache Redis supports Partial Resynchronization with Slaves - If the connection between a master node and a slave node is momentarily broken, the master now accumulates data that is destined for the slave in a backlog buffer. If the connection is restored before the buffer becomes full, a quick partial resync will be done instead of a potentially longer full resync. This really saves network bottleneck during momentary failures.
In large scale systems you will often find some partitions are heavily used than others , in event the usage is read heavy in nature you can add upto 5 Read replicas for the ElastiCache Redis Master partition. Since these replicas are used only for read they do not affect the Hash ring structure. But Twemproxy lacks the support for read scaling with Redis Replica's. So in event when you face this problem, you will have to Scale up the capacity(instance/node type) of the Master and Slave of that partition alone.
If you are using ElastiCache redis as a Data store in the TwemProxy it is recommended to keep "auto_eject_hosts" property false so that in event of redis node failure it is not ejected from the hash ring. The hash ring can be built with both ketama or modula hash algorithms , since in event of Primary node failure, the Slave is going to be promoted and ring structure is going to be always maintained. But if you feel there is immense possibility for the number of primary node partitions to grow, or major failures to occu, it is better to choose ketama hash ring itself from beginning. The below diagram illustrates the architecture.

Practice 3: Configure the Buffer properly:
All memory for incoming requests and outgoing responses is allocated in mbuf in Twemproxy. Mbuf enables zero copy for requests and responses flowing through the proxy. By default an mbuf is 16K bytes in size and this value can be tuned between 512 and 16M bytes using -m or --mbuf-size=N argument. Every connection has at least one mbuf allocated to it. This means that the number of concurrent connections twemproxy can support is dependent on the mbuf size. A small mbuf allows us to handle more connections, while a large mbuf allows us to read and write more data to and from kernel socket buffers. Large Scale web/mobile applications involving millions of hits might have small size request/response and lots of concurrent connections to handle in their backend. So at such scenarios, when Twemproxy is meant to handle a large number of concurrent client connections, you should set chunk size to a small value like 512 bytes to 1K bytes using the -m or --mbuf-size=N argument.

Practice 4: Configure proper Timeouts
It is always a good idea to configure Twemproxy timeout: for every server pool, rather than purely relying on client-side timeouts. Eg:

resilient_pool_with_timeout:
  auto_eject_hosts: true
  server_retry_timeout: 30000
  server_failure_limit: 3
  timeout: 400
Relying only on client-side timeouts has the adverse effect of the original request having timed out on the client to proxy connection, but still pending and outstanding on the proxy to server connection. This further gets exacerbated when client retries the original request.


Benefits of using Twemproxy for Redis Scaling

  • Avoids re inventing the wheel. Thanks Manju Raj (twitter).
  • reduce the number of connections to your cache server by acting as a proxy
  • shard data automatically between multiple cache servers
  • support consistent hashing with different strategies and hashing functions
  • be configured to disable nodes on failure
  • run in multiple instances, allowing client to connect to the first available proxy server
  • Pipelining and batching of requests and hence saving of round-trips


Disadvantages of Partitioning Model:

Point 1) Operations involving multiple keys are usually not supported. For instance you can't perform the intersection between two sets if they are stored in keys that are mapped to different Redis instances (actually there are ways to do this, but not directly).Redis transactions involving multiple keys can not be used.
Point 2) The partitioning granularity is the key, so it is not possible to shard a dataset with a single huge key like a very big sorted set. Ideally in such cases you should Scale UP the particular Redis Master-Slave to larger EC2 instance or pro grammatically stitch up the sorted set.
Point 3)When partitioning is used, data handling is more complex, for instance you have to handle multiple RDB / AOF files, and to make a backup of your data you need to aggregate the persistence files/snapshots from multiple EC2 Redis slaves.
Point 4) Architecting a partitioned + replicated ElastiCache Redis tier not complex. What is more complex is ? supporting transparent rebalancing of data with the ability to add and remove nodes at runtime. Systems like client side partitioning and proxies don't support this feature. However a technique called Presharding helps in this regard with limitations. Presharding technique ->Since Redis is lightweight, you can start with a lot of EC2 instances since the beginning itself. For example if you start with 32 or 64 EC2 instances (micro or small Cache Node instance type)  as your node capacity , it will provide enough room to keep scaling up the capacity when your data storage needs increase. It is not a highly recommended technique. But still can be used in production if your growth pattern is very predictable.

Future of highly scalable + available Redis tiers -> Redis Cluster
Redis Cluster is the preferred way to get automatic sharding and high availability. It is currently not production ready. Once Redis Cluster / Client  is available on Amazon ElastiCache, it will be the de facto standard for Redis partitioning. It uses a mix between query routing and client side partitioning.

References:
http://redis.io/documentation
https://github.com/twitter/twemproxy

This article was co-authored with Senthil

Other Amazon ElastiCache Articles :
Caching architectures using Memcached & Amazon ElastiCache
Highly Available ElastiCache Redis replication cluster in AWS VPC
Deep dive into Amazon Elasticache
Distributed Cache On Steroids: Amazon ElastiCache
Launching Amazon ElastiCache in 3 Easy Steps
AWS Performance Tip 3: Use Amazon ElastiCache to improve application performance


Thursday, August 14, 2014

19 Best Practices for Creating Amazon CloudFormation Templates

Amazon CloudFormation templates are widely used in the AWS cloud for environment creation by the IT and application teams.  We have been helping enterprises with Amazon CFT based automation for years and following are some of the best practices to follow while creating Amazon CFT Templates. This article compiles the CFT practices /pointers used by us for provisioning complex large scale environments on AWS, not all of them will be applicable for all use cases.
Practice #1: Version your CloudFormation templates
CloudFormation template should be commenced with a template format version and description such that it could be artifact-able with version control tools like Git, SVN, CVS, etc.,
Example:
"AWSTemplateFormatVersion": "2010-09-09",
    "Description": "AWS CloudFormation Template for CustomerXYZ Version 5.0",
Practice #2: Use input parameters
Input parameters section should be developed in scope with getting values from the end users of the CFT for environments, SSH Key Pairs, EC2 instance types, RDS instance types, ElastiCache node types, etc., and this makes the entire CloudFormation template configurable and maintainable.
Example:
"WebTierKeyName": {
            "Description": "Name of an existing EC2 KeyPair to enable SSH access to the WebTier",
            "Type": "String",
            "MinLength": "1",
            "MaxLength": "64",
            "Default": "testkey",
            "AllowedPattern": "[-_ a-zA-Z0-9]*",
            "ConstraintDescription": "can contain only alphanumeric characters, spaces, dashes and underscores."
Practice #3: AMI ID should be a parameter in inputs section
AMI ID should be asked as an input parameter from the end users for launching EC2 instances. It is highly recommended not to hard code it inside your template and make it configurable dynamically.
Example:
"NatAMIID": {
            "Type": "String",
            "Default": "ami-XXXXXXXX",
            "Description": "The AMIID of NAT Instance"
        },
Practice #4: Mention the AMI mappings
AMI Mappings should be included in the CloudFormation template to validate the respective AMI(s) in the region(s) specified else it will take default AMI for the region (which is not advisable).
Example:
"Mappings": {
        "RegionMap": {
            "us-east-1": {
                "AMI": "ami-XXXXXXXX"
            },
"us-west-2": {
                "AMI": "ami-XXXXXXXX"
            },
Practice #5: Use WaitConditionHandle, WaitCondition, DependsOn wherever applicable
When creating a large multi-tiered infrastructure using CFT on AWS, there are times when the order of the resource launch is important. For Example WaitCondition that waits for the desired number of instances in a web server group.
Using the AWS::CloudFormation::WaitCondition and AWS::CloudFormation::WaitConditionHandle resources, a wait condition can be placed with in a template to make AWS CloudFormation pause the creation of the stack and wait for a signal before it continues to create the stack.
We can specify that the creation of a specific resource to follow another using the “DependsOn” attribute. On adding a DependsOn attribute to a resource, it is created only after the creation of the resource specified in the DependsOn attribute.
Example:
"WebServerGroup" : {
   "Type" : "AWS::AutoScaling::AutoScalingGroup",
   "Properties" : {
      "AvailabilityZones" : { "Fn::GetAZs" : "" },
      "LaunchConfigurationName" : { "Ref" : "LaunchConfig" },
      "MinSize" : "1",
      "MaxSize" : "5",
      "DesiredCapacity" : { "Ref" : "WebServerCapacity" },
      "LoadBalancerNames" : [ { "Ref" : "ElasticLoadBalancer" } ]
   }
},
"WaitHandle" : {
   "Type" : "AWS::CloudFormation::WaitConditionHandle"
},
"WaitCondition" : {
   "Type" : "AWS::CloudFormation::WaitCondition",
   "DependsOn" : "WebServerGroup",
   "Properties" : {
      "Handle"  : { "Ref" : "WaitHandle" },
      "Timeout" : "300",
      "Count"   : { "Ref" : "WebServerCapacity" }
   }
}       
For example, an Amazon EC2 instance with a public IP address is dependent on the VPC-gateway attachment if the VPC and Internet Gateway resources are also declared in the same template. The following snippet shows a sample gateway attachment and an Amazon EC2 instance that depends on that gateway attachment:
"GatewayToInternet" : {
  "Type" : "AWS::EC2::VPCGatewayAttachment",
  "Properties" : {
    "VpcId" : { "Ref" : "VPC" },
    "InternetGatewayId" : { "Ref" : "InternetGateway" }
  }
},
"EC2Host" : {
  "Type" : "AWS::EC2::Instance",
  "DependsOn" : "GatewayToInternet",
    "Properties" : {
      "InstanceType" : { "Ref" : "EC2InstanceType" },
      "KeyName"  : { "Ref" : "KeyName" },
      "ImageId"  : { "Fn::FindInMap" : [ "AWSRegionArch2AMI", { "Ref" : "AWS::Region" },
        { "Fn::FindInMap" : [ "AWSInstanceType2Arch", { "Ref" : "EC2InstanceType" }, "Arch" ] } ] },
      "NetworkInterfaces" : [{
        "GroupSet"                 : [{ "Ref" : "EC2SecurityGroup" }],
        "AssociatePublicIpAddress" : "true",
        "DeviceIndex"              : "0",
        "DeleteOnTermination"      : "true",
        "SubnetId"                 : { "Ref" : "PublicSubnet" }
      }]
    }
}
Practice #6: Tag the resources properly
Tags should be used for the creation of AWS resources. Tags can be environment, purpose, application specification etc., In addition to the stack name tags that AWS CloudFormation provides, custom tags can be added to the resources that support tagging. This helps in easy grouping of the assets associated with the environment.
Example:
"Tags": [
                    {
                        "Key": "Environment",
                        "Value": {
                            "Ref": "Environment"
                        }
                    },
                    {
                        "Key": "Purpose",
                        "Value": "CustomerXYZ VPC"
Practice #7: Understand your Resources
When a CloudFormation template is deleted all AWS resources assigned with the template will be automatically deleted by AWS. For example a VPC template will have all the related resources like Route tables, Subnets, Network ACLs, etc., will be deleted.
In real scenario, S3 buckets logs, EBS snapshots etc are associated with an infrastructure but they will not terminated when the CFT is deleted, hence have to be automated for deletion using scripts.
Practice #8: Create your Security groups using CFT
Security Groups can be governed and controlled using CloudFormation template for various tiers like Web, App, DB, etc.,
"GatewayTierSg": {
            "Type": "AWS::EC2::SecurityGroup",
            "Properties": {
                "GroupDescription": "Gateway Security Group",
                "VpcId": {
                    "Ref": "Vpc"
                },
                "SecurityGroupIngress": [
                    {
                        "IpProtocol": "6",
                        "FromPort": "22",
                        "ToPort": "22",
                        "CidrIp": "0.0.0.0/0"
                    }
                ],
                "SecurityGroupEgress": [
                    {
                        "IpProtocol": "-1",
                        "CidrIp": "10.0.0.0/16"
                    }
                ]
            }
        },
Practice #9: Include the Output Section.
Output section should be declared with AWS specific end points to trace back. The template Outputs section enables in returning one or more values to the user in response to the AWS CloudFormation describe-stacks command. Example your endpoints are shown on the Output section.
Example:
"RDSDatabaseEndpointDetail": {
            "Description": "RDSDatabaseEndpointDetails",
            "Value": {
                "Fn::GetAtt": [
                    "RdsTierService",
                    "Endpoint.Address"
                ]
            }
        },
        "ElastiCacheEndpointDetail": {
            "Description": "ElastiCacheEndpointDetails",
            "Value": {
                "Fn::GetAtt": [
                    "ElatiCacheTierService",
                    "ConfigurationEndpoint.Address"
                ]
            }
        },
        "WebTierElbExternalEndpointDetail": {
            "Description": "WebTierElb External Endpoint Access Details",
            "Value": {
                "Fn::GetAtt": [
                    "WebTierElbExternal",
                    "DNSName"
                ]
            }

        },


Practice #10: Automate Application Installation using cloud-init

With the help of cloud-init the installation of various packages can be done during the boot itself just by passing the appropriate commands. In the cloud-init the scripts also can be passed through the automation of various operations can be done.

"Resources" : {
    "Ec2Instance" : {
      "Type" : "AWS::EC2::Instance",
      "Properties" : {
        "KeyName" : { "Ref" : "KeyName" },
        "SecurityGroups" : [ { "Ref" : "InstanceSecurityGroup" } ],
        "ImageId" : { "Fn::FindInMap" : [ "RegionMap", { "Ref" : "AWS::Region" }, "AMI" ]},
        "UserData" : { "Fn::Base64" : { "Fn::Join" : ["",[
            "#!/bin/bash -ex","\n",
            "yum -y install gcc-c++ make","\n",
            "yum -y install mysql-devel sqlite-devel","\n",
            "yum -y install ruby-rdoc rubygems ruby-mysql ruby-devel","\n",
            "gem install --no-ri --no-rdoc rails","\n",
            "gem install --no-ri --no-rdoc mysql","\n",
            "gem install --no-ri --no-rdoc sqlite3","\n",
            "rails new myapp","\n",
            "cd myapp","\n",
            "rails server -d","\n",
            "curl -X PUT -H 'Content-Type:' --data-binary '{\"Status\" : \"SUCCESS\",",
                                                           "\"Reason\" : \"The application myapp is ready\",",
                                                           "\"UniqueId\" : \"myapp\",",
                                                           "\"Data\" : \"Done\"}' ",
                  "\"", {"Ref" : "WaitForInstanceWaitHandle"},"\"\n" ]]}}
      }

Practice #11: Use helper scripts to start/stop services etc

AWS CloudFormation provides a set of Python helper scripts that you can use to install software and start services on an Amazon EC2 instance that you create as part of your stack. You can call the helper scripts directly from your template. The scripts work in conjunction with resource metadata that you define in the same template. The helper scripts run on the Amazon EC2 instance as part of the stack creation process.

"Resources" : {


"WebServer": {
"Type": "AWS::EC2::Instance",
"Metadata" : {
"Comment1" : "Configure the bootstrap helpers to install the Apache Web Server and PHP",
"Comment2" : "The website content is downloaded from the CloudFormationPHPSample.zip file",

"AWS::CloudFormation::Init" : {
"config" : {
"packages" : {
"yum" : {
"mysql" : [],
"mysql-server" : [],
"mysql-libs" : [],
"httpd" : [],
"php" : [],
"php-mysql" : []
}
},

"sources" : {
"/var/www/html" : "
https://s3.amazonaws.com/cloudformation-examples/CloudFormationPHPSample.zip"
},

"files" : {
"/tmp/setup.mysql" : {
"content" : { "Fn::Join" : ["", [
"CREATE DATABASE ", { "Ref" : "DBName" }, ";\n",
"GRANT ALL ON ", { "Ref" : "DBName" }, ".* TO '", { "Ref" : "DBUsername" }, "'@localhost IDENTIFIED BY '", { "Ref" : "DBPassword" }, "';\n"
]]},
"mode" : "000644",
"owner" : "root",
"group" : "root"
}
},


Practice #12: Make use of parameter section constraints (wherever applicable)

The parameter sections provide lot of constraints like MinValue, Max Value, Allowed values, Max length, etc. By effective usage of the of the parameter section you can validate the input parameters from the user. Example:  We can restrict TCP port value to be between 1 to 65535, we can restrict the webserver port to 80,8888 etc. This feature is particularly useful when you are developing complex cloudformation template for automation.


"Parameters" : {
    "UserAccount": {
      "Default": "guest",
      "NoEcho": "true",
      "Description" : "The guest account user name",
      "Type": "String",
      "MinLength": "1",
      "MaxLength": "16",
      "AllowedPattern" : "[a-zA-Z][a-zA-Z0-9]*"
    }
}

"Parameters" : {
    "WebServerPort": {
      "Default": "80",
      "Description" : "TCP/IP port for the web server",
      "Type": "Number",
      "MinValue": "1",
      "MaxValue": "65535"
    }
}

"Parameters" : {
    "WebServerPort": {
      "Default": "80",
      "Description" : "Port for the web server",
      "Type": "Number",
      "AllowedValues" : ["80", "8888"]
    }
}

Practice #13: Use NoEcho property for sensitive information

When the cloudformation is in progress we can use describe-stacks to check the progress of the stack, in this case we can see the parameters values being returned. If we use the NoEcho Property like below, the sensitive information will not be returned.
 "AdminPassword": {
      "NoEcho": "true",
      "Description" : "The Joomla! admin account password",
      "Type": "String",
      "MinLength": "1",
      "MaxLength": "41",
      "AllowedPattern" : "[a-zA-Z0-9]*",
      "ConstraintDescription" : "must contain only alphanumeric characters."
    }


Practice #14: Use Select Function and reduce the parameters in the template

Fn::Select intrinsic function:Using the above function in the in the Resources section of your template will help you to combine related parameters which can reduce the total number of parameters in your template.
"Parameters" : {
  "DbSubnetBlocks": {
    "Description": "Three CIDR blocks",
    "Type": "CommaDelimitedList",
      "Default": "10.0.58.0/24, 10.0.59.0/24, 10.0.60.0/24"
  }
}
To specify one of the three CIDR blocks, use Fn::Select in the Resources section of the same template, as shown in the following sample snippet:
"Subnet1": {
  "Type": "AWS::EC2::Subnet",
    "Properties": {
      "VpcId": { "Ref": "VPC" },
      "CidrBlock": { "Fn::Select" : [ "0", {"Ref": "DbSubnetBlocks"} ] }
    }
}


Practice #15: Use intrinsic Functions to manage automation
 Fn::FindInMap intrinsic function
The function Fn::FindInMap returns the value corresponding to keys in a two-level map that is declared in the Mappings section.
{
  ...
  "Mappings" : {
    "RegionMap" : {
      "us-east-1" : { "32" : "ami-6451e20d", "64" : "ami-7a11e213" },
      "us-west-1" : { "32" : "ami-d5gc7978c", "64" : "ami-cfc7978a" }
         }
  },

  "Resources" : {
     "myEC2Instance" : {
        "Type" : "AWS::EC2::Instance",
        "Properties" : {
           "ImageId" : { "Fn::FindInMap" : [ "RegionMap", { "Ref" : "AWS::Region" }, "32"]},
           "InstanceType" : "m3.large"
        }
     }
 }
}
You can use intrinsic functions, such as Fn::If, Fn::Equals, and Fn::Not, to conditionally create stack resources. These conditions are evaluated based on input parameters that you declare when you create or update a stack. After you define all your conditions, you can associate them with resources or resource properties in the Resources and Outputs sections of a template

Practice #16: Properties section

If a resource does not require any properties to be declared, you can omit the Properties section of that resource. This will keep the template code simple and manageable

"Resources" : {
    "WebInstance" : {
        "Type" : "AWS::EC2::Instance",
        "Properties" : {
            "UserData" : {
                "Fn::Base64" : {
                    "Fn::Join" : [ "", [ "Queue=", { "Ref" : "MyQueue" } ] ]
                 } },
              "ImageId" : "ami-20b65349"
        }
    },

    "MyQueue" : {
        "Type" : "AWS::SQS::Queue",
        "Properties" : {
        }
    }
}    


Practice #17: Planning Windows Bootstrapping using Amazon CFT

In order for the Windows bootstrapping to work the CloudFormation the windows instance should be setup with the EC2ConfigService. The AWS CloudFormation helper script cfn-init is used to perform each of these actions, based on information in the AWS::CloudFormation::Init resource.
"SharePointFoundation": {
   "Type" : "AWS::EC2::Instance",
   "Metadata" : {
     "AWS::CloudFormation::Init" : {
       "config" : {

"files" : {
  "c:\\cfn\\cfn-hup.conf" : {
    "content" : { "Fn::Join" : ["", [
      "[main]\n",
      "stack=", { "Ref" : "AWS::StackName" }, "\n",
      "region=", { "Ref" : "AWS::Region" }, "\n"
      ]]}
  },
  "c:\\cfn\\hooks.d\\cfn-auto-reloader.conf" : {
    "content": { "Fn::Join" : ["", [
      "[cfn-auto-reloader-hook]\n",
      "triggers=post.update\n",
      "path=Resources.SharePointFoundation.Metadata.AWS::CloudFormation::Init\n",
      "action=cfn-init.exe -v -s ", { "Ref" : "AWS::StackName" },
                                     " -r SharePointFoundation",
                                     " --region ", { "Ref" : "AWS::Region" }, "\n"
    ]]}
  },
  "C:\\SharePoint\\SharePointFoundation2010.exe" : {
  }
},


Practice #18: Use Nested Stacks 
You can declare only Maximum of 200 resources in your AWS CloudFormation template. For complex environments and automation stacks you will need more than that, it is recommended to separate your template into multiple templates using the nested stacks feature.

{
    "AWSTemplateFormatVersion" : "2010-09-09",
    "Resources" : {
        "myStack" : {
               "Type" : "AWS::CloudFormation::Stack",
               "Properties" : {
                  "TemplateURL" : "https://s3.amazonaws.com/cloudformation-templates-us-east-1/S3_Bucket.template",
              "TimeoutInMinutes" : "60"
               }
        }
    },
    "Outputs": {
       "StackRef": {"Value": { "Ref" : "myStack"}},
       "OutputFromNestedStack" : {
             "Value" : { "Fn::GetAtt" : [ "myStack", "Outputs.BucketName" ] }
       }
    }
}

Practice #19: Integrate Amazon CFT with Amazon CloudTrail
It is recommended that AWS CloudFormation is integrated with the CloudTrail. The actions related to CloudFormation like CreateStack, DeleteStack, and ListStacks actions generate entries in CloudTrail log files.  These logs can be processed for audit compliance purpose later.


Need Consulting help ?

Name

Email *

Message *

DISCLAIMER
All posts, comments, views expressed in this blog are my own and does not represent the positions or views of my past, present or future employers. The intention of this blog is to share my experience and views. Content is subject to change without any notice. While I would do my best to quote the original author or copyright owners wherever I reference them, if you find any of the content / images violating copyright, please let me know and I will act upon it immediately. Lastly, I encourage you to share the content of this blog in general with other online communities for non-commercial and educational purposes.

Followers