When Elastic Load Balancing is used for e-commerce and enterprise applications , securing the communication channel becomes an essential. Critical customer , payment info etc cannot be sent over the HTTP protocol in clear over the internet. To address this need , HTTPS/SSL has been widely used in the internet. HTTPS protocol secures the communication between the Client (Browser etc) and the Server side. In case of multitiered distributed Systems SSL can be offloaded at various levels. some of the commonly used offloading layers are Load Balancers and Web servers. In this article we will see how to configure ELB to offload SSL .
There are several advantages to using HTTPS/SSL connections with your load balancer:
There are several advantages to using HTTPS/SSL connections with your load balancer:
- The SSL server certificate used to terminate client connections can be managed centrally on the load balancer, rather than on every individual application instance.
- The work of encrypting and decrypting SSL traffic is moved from the application instance to the load balancer.
- The load balancer can ensure session affinity or "sticky sessions" in this documentation, by terminating the incoming HTTPS request and then re-encrypting the content to send to the back-end application instance.
- All of the features available for HTTP can be used with HTTPS connections as well
Step 1: Creating Load Balancer
Go to AWS Management Console ,> Select the AWS Region, > Select EC2 Tab and click on Load balancers to create a new load balancer .
Notes : By Default if no AWS Region is selected it will create the Elastic Load Balancer in USA-East
Currently, the client's quota of LoadBalancers is limited to ten per Region. This can be increased by filling the following form: http://aws.amazon.com/contact-us/elb-request/

Step 2: Defining the Load Balancer
- Assign a unique name to the new load balancer so that you can identify it from other load balancers you might create in future.
- Create LB inside will list "EC2" and your "VPC Names" created in the region in this account.
- By selecting EC2 you are creating the Elastic Load Balancer in Public cloud of AWS inside the Region
- By selecting any "VPC Name" you will creating the Load Balancer inside the Virtual Private Cloud of AWS inside the region
- By default, AWS would have configured your load balancer with a standard web server on port 80 which shows on the Screen
- Configure ports and protocols( HTTPS , TCP , SSL) for your Elastic load balancer.

Step 3: Upload the SSL certificate
- An SSL Certificate allows us to configure the HTTPS/SSL listeners of your Load Balancer. We can select a previously uploaded certificate , or define a new SSL Certificate by supplying certificate name, a private key (pem encoded), and a public key certificate (pem encoded). we can also provide an optional public key certificate chain (pem encoded). (Note: The certificate you choose here will apply to all the HTTPS/SSL listeners you configured.
- We cannot use the name of the expired certificate.
Certificate Chainis optional. If you are usingCertificate Chain, then you must order the certificates such that the root certificate is the last certificate in the chain. If you use a certificate chain in a different order, you will receive an error.

Step 4: Configure the SSL Protocol and Cipher
settings
Elastic Load Balancing configures your load balancer with a pre-defined cipher set that is used for SSL negotiation when a connection is established between a client and your load balancer. The pre-defined cipher set provides compatibility with a broad range of clients and uses higher strength cryptographic algorithms. However, some use cases may require that all data on the network be encrypted and allow only specific ciphers: and protocols from clients in order to meet certain standards (such as PCI, SOX, etc.). In such cases, Elastic Load Balancing provides options for you to select different configurations for SSL protocols and ciphers.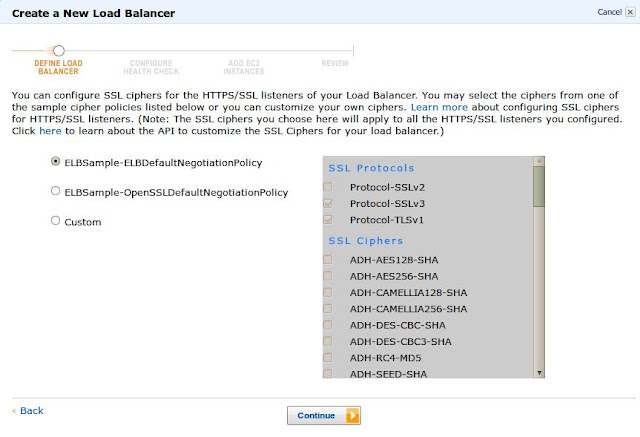
There are at least three protocol suites in use (SSLv2, SSLv3 and TLSv1), which between them support tens of different crypto algorithms with different strengths. Not all of those are still suitable for serious use today.
During an SSL handshake between a client and a server the cipher to use is negotiated between the two machines. In practical terms this means that the client send list of ciphers it is able and willing to use to the server (in our case Amazon ELB), the server compares this list with it’s own list of supported ciphers and, if a cipher supported by both sides is found returns it’s choice to the client. Let us explore the options provided in Amazon ELB :
Option 1: ELBSample-ELBDefaultNegotiationPolicy
This is the default Negotiation policy. Protocols supported are SSLv3.0 and TLSv1.0. Ciphers supported are AES 128/256 -SHA , RC4 -MD5/SHA and DES-CBC3-SHA. AES is a block cipher algorithm and is "supposed to be more secure" and RC4 is the "fastest" stream cipher algorithm , for performance it is suggested to use RC4 with small RSA key size and for security use keys size > to 2048bits. Most Software load balancers including Amazon ELB performs poorer when it has to work with bigger key size.
Option 2: ELBSample-OpenSSLDefaultNegotiationPolicy
The OpenSSL Project is a collaborative effort to develop a robust, commercial-grade, full-featured, and Open Source toolkit implementing the Secure Sockets Layer(SSL v2/v3) and Transport Layer Security (TLS v1) protocols as well as a full-strength general purpose cryptography library. Protocols supported are SSLv3.0 and TLSv1.0. "44" Ciphers including AES/RC4/DES/DHE etc are supported in this policy.
On the protocol side , SSLv2 is strongly discouraged due to vulnerabilities , To be on the safe side we recommend to explicitly disable SSLv2 ciphers, so they cannot be reintroduced later: AES is a block cipher algorithm and is "supposed to be more secure" and RC4 is the "fastest" stream cipher algorithm.
On the Cipher side the weak candidate is the DES algorithm. Although it was never cryptographically broken, it’s key length of 56 bits made it increasingly more vulnerable to brute force attacks as faster CPUs became available. Since the Electronic Frontier Foundation demonstrated a custom-built DES cracker in 1998, and able to brute-force a DES key in under two days, DES has been effectively dead. But, for compatibility reasons, OpenSSL is, by default, willing to negotiate DES as a cipher.
Elastic Load Balancing configures your load balancer with a pre-defined cipher set that is used for SSL negotiation when a connection is established between a client and your load balancer. The pre-defined cipher set provides compatibility with a broad range of clients and uses higher strength cryptographic algorithms. However, some use cases may require that all data on the network be encrypted and allow only specific ciphers: and protocols from clients in order to meet certain standards (such as PCI, SOX, etc.). In such cases, Elastic Load Balancing provides options for you to select different configurations for SSL protocols and ciphers.

There are at least three protocol suites in use (SSLv2, SSLv3 and TLSv1), which between them support tens of different crypto algorithms with different strengths. Not all of those are still suitable for serious use today.
During an SSL handshake between a client and a server the cipher to use is negotiated between the two machines. In practical terms this means that the client send list of ciphers it is able and willing to use to the server (in our case Amazon ELB), the server compares this list with it’s own list of supported ciphers and, if a cipher supported by both sides is found returns it’s choice to the client. Let us explore the options provided in Amazon ELB :
Option 1: ELBSample-ELBDefaultNegotiationPolicy
This is the default Negotiation policy. Protocols supported are SSLv3.0 and TLSv1.0. Ciphers supported are AES 128/256 -SHA , RC4 -MD5/SHA and DES-CBC3-SHA. AES is a block cipher algorithm and is "supposed to be more secure" and RC4 is the "fastest" stream cipher algorithm , for performance it is suggested to use RC4 with small RSA key size and for security use keys size > to 2048bits. Most Software load balancers including Amazon ELB performs poorer when it has to work with bigger key size.
Option 2: ELBSample-OpenSSLDefaultNegotiationPolicy
The OpenSSL Project is a collaborative effort to develop a robust, commercial-grade, full-featured, and Open Source toolkit implementing the Secure Sockets Layer(SSL v2/v3) and Transport Layer Security (TLS v1) protocols as well as a full-strength general purpose cryptography library. Protocols supported are SSLv3.0 and TLSv1.0. "44" Ciphers including AES/RC4/DES/DHE etc are supported in this policy.
Option 3: Custom policy
When you select custom option by default all the ciphers options chosen by previously clicking ELBDefaultNegotiation (or) OpenSSLDefaultNegotiationPolicy are in selected state. On the protocol side , SSLv2 is strongly discouraged due to vulnerabilities , To be on the safe side we recommend to explicitly disable SSLv2 ciphers, so they cannot be reintroduced later: AES is a block cipher algorithm and is "supposed to be more secure" and RC4 is the "fastest" stream cipher algorithm.
On the Cipher side the weak candidate is the DES algorithm. Although it was never cryptographically broken, it’s key length of 56 bits made it increasingly more vulnerable to brute force attacks as faster CPUs became available. Since the Electronic Frontier Foundation demonstrated a custom-built DES cracker in 1998, and able to brute-force a DES key in under two days, DES has been effectively dead. But, for compatibility reasons, OpenSSL is, by default, willing to negotiate DES as a cipher.
Step 5: Configuring the Health Checks
Elastic load balancer will automatically perform health checks on the Amazon EC2 instances attached to it and only route traffic to EC2 instances that pass the health check. If an instance fails the health check, it is automatically removed from the load balancer. Customize the health check to meet your specific use cases .
Ping Protocol : The protocol is either TCP, HTTP, HTTPS, or SSL. The range of valid ports is one (1) through 65535.
TCP is one of the Health Check mode, specified as a "TCP" in drop down: port pair, for example "TCP:6000". In this case a health check simply attempts to open a TCP connection to the EC2 instance on the specified port. Failure to connect within the configured timeout is considered unhealthy.
For HTTP or HTTPS protocol, the situation is different.You have to include a ping path. For example "HTTP:80/health/us/check". In this case, a HTTP GET request is issued to the instance on the given port and path. Any answer other than "200 OK" within the timeout period is considered unhealthy.
The total length of the HTTP ping target needs to be 1024 16-bit Unicode characters or less.
Response timeout : Specifies the time in seconds, during which no response received means a failed health probe. The value that can be configured should be between 2 sec - 60 sec. Giving bigger values will result in error message. Also this value must be less than the Health Check Interval value. (if the Response timeout is greater than Health Check interval , then more health check requests will be sent to the EC2 instance and overall will cause instability in the infrastructure. Amazon ELB proactively restricts this configuration with an error message)
Unhealthy Threshold : Specifies the number of consecutive health check failures before declaring an EC2 instance unhealthy.The value that can be configured should be between 2 -10.
Healthy Threshold : Specifies the number of consecutive health check success before declaring an EC2 instance healthy.The value that can be configured should be between 2 -10.

Why extra care should be taken while configuring health Checks in AWS infrastructure ?
Case 1: During heavy traffic in websites
Configuring a lesser unhealthy threshold value with aggressive response time out + Health Check interval , will mark EC2 instance unhealthy quickly and will stop sending requests. This will add burden on other EC2 instances under ELB quickly and there are chances they will also fail soon.
Case 2: During heavy traffic with Amazon Auto Scaling
Configuring a lesser unhealthy threshold value with aggressive response time out + Health Check interval , will mark EC2 instance unhealthy quickly and will stop sending requests. In addition , a signal will be sent to Amazon Auto Scaling to restart this EC2 instance since it is unhealthy. Even though you had requested Amazon Auto Scaling to maintain minimum of 4 instances at any time, you will find some EC2 instances getting frequently restarted within this minimum. This will add burden on other EC2 instances quickly and there are chances they will also fail soon during heavy traffic.
Case 3: During heavy traffic with Amazon Auto Scaling , EC2 with Cache
Configuring a lesser unhealthy threshold value with aggressive response time out + Health Check interval , will mark EC2 instance unhealthy quickly and will stop sending requests. In addition , will send a signal to Amazon Auto Scaling to relaunch this EC2 instance. Even though you had requested Amazon Auto Scaling to maintain minimum of 4 instances , you will find some EC2 instances getting frequently restarted. If you maintain Cache in these EC2 instances (Web servers) like Memcached, W3TotalCache etc to offload the traffic from DB servers and SOlr Servers , such frequent EC2 web server restarts will not give enough time for cache warming. This will add burden to the EC2 instances in web layer, DB servers etc and overall bring down the entire infrastructure.
Step 6: Add EC2 instance to the Load balancer
Attach EC2 instances to Elastic Load Balancer in this step. This screen will list
all your running EC2 Instances that are not already behind another load balancer or part of an auto-scaling capacity group. Check the boxes in the Select column to add those instances to this load balancer. It is best practice to attach atleast 2 or more EC2 instances from 2 or more Availability Zones in the region. This provides High availability in the web/App layer. ELB seamlessly Load balances the EC2 instances deployed across Multiple AZ's.

Step 7: Review the ELB configuration
Please review your ELB configurations on this Screen. By Clicking "Create" you will launch your load balancer in the AWS

Step 8: Successful creation
On Successful creation, you can view load balancer and its parameters in management console
LoadBalancer DNS names vary depending on the Region they're created in. For LoadBalancers created in the United States, the DNS name ends with:
• us-east-1.elb.amazonaws.com (for the US Standard Region)
• us-west-1.elb.amazonaws.com (for the Northern California Region)
Other Load Balancing Articles :
Dissecting Amazon ELB: 18 things you should know
Monitoring ELB with Amazon CloudWatch
Configuring Amazon ELB using AWS Management Console
Amazon ELB Implementation Architectures
Amazon Elastic Load balancing benefits
Why do we need Elastic Load Balancing ?
Offloading SSL in Amazon ELB
Amazon ELB and Flash Traffic
2 comments:
Should the healthy threshold read:
Healthy Threshold : Specifies the number of consecutive health check success before declaring an EC2 instance HEALTHY.The value that can be configured should be between 2 -10.
???
It is an typo. Thanks , I have corrected.
Post a Comment